Showing posts with label holidays. Show all posts

Monday, December 23, 2013

How To Make a Tacky Sweater

Here are two tutorials, but I must admit are not my best.  If you've followed previous tutorials I give you step-by-step pictures but I made these late at night and was so focused on getting them done that I took very few photos of the process.  So for that, I apologize but I also think you can get the gist of things by what I've provided.  If not, feel free to send me an e-mail :)

Supplies:
Sweatshirt
Fabric Paint
Cardboard or Something to Place in Sweatshirt
Paint Brushes
Decorating Accessories
Fabric Tacky Glue
Optional: Washi Tape

What Kim Used:  I found our sweatshirts at Old Navy, where they had a sale on their crewnecks for only $10.  Super comfortable and great quality?  It's a win-win for everybody.  

Initially I wanted a very deep green for my sweatshirt because I was going to make a tree, however, I couldn't find the right color at Michael's.  I knew that I had black fabric paint at home, so I decided to make my own color at home.  However, once I got home I realized a more minty green would look fabulous on the sweatshirt.  So instead of mixing black, I actually added white and silver sparkles fabric paint.  I created a custom sparkly mint green for my tree and it turned out really cute.

Michael's sold cardboard shirt pieces for painting shirts and making sure the paint didn't bleed through so I spent a $1.50 on that.  Obviously cardboard from your garage works just as well but I honestly didn't want to cut up a box.  It's the holidays and they're already stressful so no thanks!

When it came to decorating accessories, I had a ton of various sequins at home and I bought Christmas light buttons and pom pom balls of different sizes while I was at Michael's.  I also had tacky glue at home so this was a fairly inexpensive project for me.


Step 1: I placed the cardboard piece in the sweatshirt and also laid out a pattern of a tree using the washi tape.  Now you don't necessarily need washi tape but in using it, I had really clean lines and it also inspired me to create that custom mint color instead of a dark green. 

Step 2: Paint!  After I painted my first layer, I realized that there was way too much space between the branches of the tree.  Therefore I whipped out the washi tape once again and added more!

 
Step 3: Decorate! Once your tree is significantly dry, take that tacky glue and start adding your accessories.  I used sequins as ornaments, buttons as lights (because, well they actually look like Christmas lights), and pom poms as various ornaments too.  
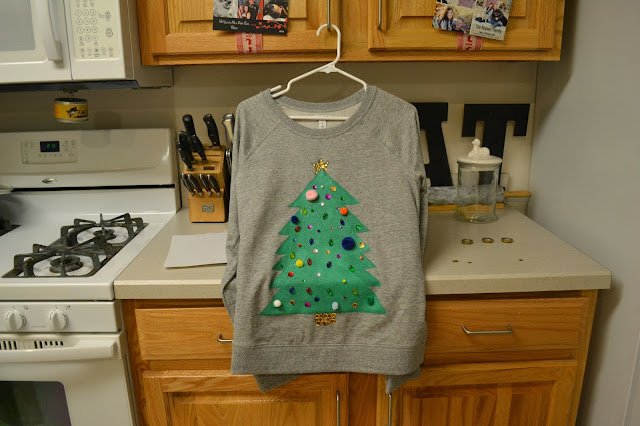
 
Step 4: Top her off with a star and a base.  I laid out various sizes of gold sequins and put those aside to make the base and star of the tree.  I then took the tacky glue and created those shapes on the sweatshirt and added the sequins.


Just wait for it to dry and there you have your own tacky Christmas sweater!!

Now this next one is trickier and of course, I only have pictures of the finished product (sorry!). You'll really only need that washi tape and white fabric paint for this.  I used the pointed tip of the fabric paint as my detail tool and I also printed off various pictures of a similar design to freehand this.


Step 1: Print off your design so that you can scale it according to the sweatshirt's size and section it off in washi tape.  I created a large rectangle as the outer layer and then separated it into rows so that I could add the text and content.

Step 2: Start designing!  The most complex aspect of this design is how detailed it is.  If you look at the screenprinted sweaters, the design is made to look like it's hand-embroidered.  So I used tons of connecting X's to make this and it took awhile but I love the finished product.  The washi tape helped to make sure that everything turned out symmetrical and looked great.


Just wait for it to dry and you have a great tacky Christmas Sweater!
 
 
If you liked this post, share it with others! If you feel particularly moved by it, leave a comment because I love feedback and discussion. Social media links are provided below and thanks for reading!
 photo signature_zpsc0b51015.jpg

Thursday, October 10, 2013

Is it Just Me or Is Halloween Like Crazy Expensive?


I absolutely love decorating and now that we've moved into this awesome house, I have felt the urge to decorate every square inch of it.  Then real life sets in and I walk around Target and see that every Pinterest-worthy item is easily $20 or more.  A couple items later and you've spent $100 and that's only the bathroom. Yikes!

It also certainly doesn't help that the other end of our street is stacked with houses that are decked to the nines with holiday decor.  There's a house that is overwhelmed with huge fake spiders and it looks totally and completely awesome.  Another family built this crate that when you walk by it, it shakes furiously.  The number of Halloween-style cemeteries on the end of my street is impressive.  For awhile there I tried to brainstorm how I could bring the dancing ghosts from Disney's Haunted House ride to my yard because I felt the strong urge to one-up those cemeteries.

 
Then I realized that might be impossible.  
 
However this is not the first holiday that Ryan and I have been married and on a limited budget.  Last year, when we lived at Vandenberg AFB, we had a roommate named Brittany.  Brittany and I have been good friends for a long time and definitely decked out the entire house in Halloween decor.  Her birthday is towards the end of the month and we held a Halloween party but everything that could be decorated had something Halloween related with it.
 
Here are my top tips for celebrating Halloween within in a budget:
 
 
 1. Look for sale items and utilize coupons.
Although this seems like a no-brainer, people have a tendency to pick up an item as soon as they think they might need it.  Michael's has Halloween decor on sale starting in late September and usually it's 40% off.  The problem with waiting for Halloween to be over with and looking for post-Halloween sales is that stuff either completely gone or picked over.  Michael's, Hobby Lobby, Joanne's, and Target all have apps and weekly coupons.  You could end up saving 40% with an app coupon and that smartphone is handy to have around.
 
2.  Choose decorations that can be used again.
Last year, Brittany and I invested in probably 20 spiderwebs.  We had the glow-in-the-dark webs and they covered everything from our outside decor to the vaulted ceilings in our rental house.  We threw them all away once Halloween passed and that's something I regret.  Last year, those stretchy spiderwebs were $1-$2, but this year they're $3.  That means by simply buying three spiderwebs for outdoor decor, you're investing $9 into something that will be thrown away.  By choosing quality decorations, you can use them year after year.  

Last year I also visited a Halloween party store...one of my favorite things.  Everything is really cheap, however, it's cheap because it really only lasts for that Halloween.  After Halloween had passed, only two of the five foam tombstones in our front yard made it.  I salvaged those two but even this year, they really can't handle Montana winds.
 
3.  If you can save it, save it.
One of my favorite decorations that we have are the black diecut bats from a Martha Stewart craft kit that I got on sale at Michael's last year.  They're made out of thick cardstock and the sticky tabs that they came with are obviously no longer good this year, but a $3 package of command poster tabs is a great replacement. 
 
4. Little things can work wonders.
Little items, such as Halloween-themed bathroom hand towels, bunting, or a small garland are the little details that add up to so much more.  If I see smaller ceramic pumpkins on sale, I usually buy them because they can go on any surface in your home or can be used for a greater collection.
 
5. Thrift!
If you didn't know, Target donates leftover stock items to local Goodwills.  So definitely stop by and see what you can find.  This year, I found Halloween items from last year that were only a couple bucks.  On that trip I spent $30 at Goodwill but got a ton of decorating items for places like my kitchen and the bathroom. 

6. Compare but be Realistic.
Instagram and Pinterest are great tools to stir your creative pot and get ideas flowing.  However, make sure to be realistic with your budget and time.  The house down the road may be in a better financial situation, or they have been collecting decorations for years.  Don't play "keeping up with the Smith's." It will become exhausting and takes the fun out of decorating.  Also remember that simplicity goes a long way.

What are your tips for Halloween decorating?


If you liked this post, share it with others! If you feel particularly moved by it, leave a comment because I love feedback and discussion. Social media links are provided below and thanks for reading!
 photo signature_zpsc0b51015.jpg