Showing posts with label Tutorial. Show all posts

Wednesday, January 1, 2014

Glitter in Her Veins: Glitter Eyelids for NYE 2013

New Year's Eve was so much fun! Our friend Hannah hosted a small get together with friends to commemorate the new year and we had a blast.  I seriously need to get Just Dance for XBOX because I LOVE that game!  It's a good, quick cardio workout that's for sure.

After seeing so many fantastic Instagram posts about glittery eyes for New Year's, I just knew that I had to at least give it a shot and I loved how they turned out.  Paired with my aqua sparkle top, I seriously felt like a mermaid and I probably belonged at an Atlantic City party more than in Montana but I totally didn't care.
Fake eyelashes here
No fake lashes here
 

If you're interested in getting the look, I used Carli Bybel's tutorial and posted it below.  I think she's super fun =] Problems that I ran into while attempting the look were the brand of fake eyelashes I used (not my favorite brand).  They were very thick and had a mind of their own (boooooo).  I have used fake eyelashes since high school for major events or pictures because they make your eyes POP but I wasn't a fan of these ones.  I also wish I had liquid eyeliner.  I only had pencil and cream pot ones and that made it difficult to add more definition over the glitter.  I also didn't have MAC's Fix + but I do use Skindinavia's All Nighter Make-up spray so I used that, as well as a small amount of eyelash glue, over my lids to create a concrete base and it worked flawlessly.  Now if only my eyelashes were more cooperative.


This picture was a little too dark originally and ladies always look so fabulous with that New Year's Eve glow :)

I hope you had an amazing NYE!
Do you do resolutions or one little word or both?
2014 is going to be fabulous, fierce, bold, crazy, and amazing!
I simply cannot wait =]


Monday, December 23, 2013

How To Make a Tacky Sweater

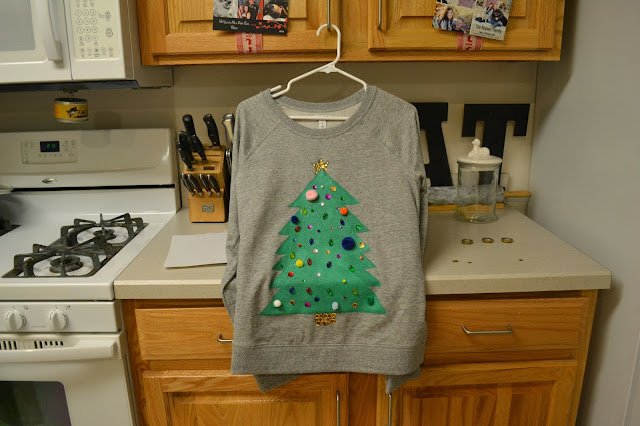
Here are two tutorials, but I must admit are not my best.  If you've followed previous tutorials I give you step-by-step pictures but I made these late at night and was so focused on getting them done that I took very few photos of the process.  So for that, I apologize but I also think you can get the gist of things by what I've provided.  If not, feel free to send me an e-mail :)

Supplies:
Sweatshirt
Fabric Paint
Cardboard or Something to Place in Sweatshirt
Paint Brushes
Decorating Accessories
Fabric Tacky Glue
Optional: Washi Tape

What Kim Used:  I found our sweatshirts at Old Navy, where they had a sale on their crewnecks for only $10.  Super comfortable and great quality?  It's a win-win for everybody.  

Initially I wanted a very deep green for my sweatshirt because I was going to make a tree, however, I couldn't find the right color at Michael's.  I knew that I had black fabric paint at home, so I decided to make my own color at home.  However, once I got home I realized a more minty green would look fabulous on the sweatshirt.  So instead of mixing black, I actually added white and silver sparkles fabric paint.  I created a custom sparkly mint green for my tree and it turned out really cute.

Michael's sold cardboard shirt pieces for painting shirts and making sure the paint didn't bleed through so I spent a $1.50 on that.  Obviously cardboard from your garage works just as well but I honestly didn't want to cut up a box.  It's the holidays and they're already stressful so no thanks!

When it came to decorating accessories, I had a ton of various sequins at home and I bought Christmas light buttons and pom pom balls of different sizes while I was at Michael's.  I also had tacky glue at home so this was a fairly inexpensive project for me.


Step 1: I placed the cardboard piece in the sweatshirt and also laid out a pattern of a tree using the washi tape.  Now you don't necessarily need washi tape but in using it, I had really clean lines and it also inspired me to create that custom mint color instead of a dark green. 

Step 2: Paint!  After I painted my first layer, I realized that there was way too much space between the branches of the tree.  Therefore I whipped out the washi tape once again and added more!

 
Step 3: Decorate! Once your tree is significantly dry, take that tacky glue and start adding your accessories.  I used sequins as ornaments, buttons as lights (because, well they actually look like Christmas lights), and pom poms as various ornaments too.  

 
Step 4: Top her off with a star and a base.  I laid out various sizes of gold sequins and put those aside to make the base and star of the tree.  I then took the tacky glue and created those shapes on the sweatshirt and added the sequins.


Just wait for it to dry and there you have your own tacky Christmas sweater!!

Now this next one is trickier and of course, I only have pictures of the finished product (sorry!). You'll really only need that washi tape and white fabric paint for this.  I used the pointed tip of the fabric paint as my detail tool and I also printed off various pictures of a similar design to freehand this.


Step 1: Print off your design so that you can scale it according to the sweatshirt's size and section it off in washi tape.  I created a large rectangle as the outer layer and then separated it into rows so that I could add the text and content.

Step 2: Start designing!  The most complex aspect of this design is how detailed it is.  If you look at the screenprinted sweaters, the design is made to look like it's hand-embroidered.  So I used tons of connecting X's to make this and it took awhile but I love the finished product.  The washi tape helped to make sure that everything turned out symmetrical and looked great.


Just wait for it to dry and you have a great tacky Christmas Sweater!
 
 
If you liked this post, share it with others! If you feel particularly moved by it, leave a comment because I love feedback and discussion. Social media links are provided below and thanks for reading!
 photo signature_zpsc0b51015.jpg

Wednesday, December 4, 2013

Melted Snowman Ornament Tutorial

December it's the most wonderful time of the year!!


This melted snowman ornament could melt anyone's heart! It takes a bit of effort on the crafter's part but the result is very cute and perfect addition to any tree.


Make sure the ribbon you get has the wire edge because it helps you shape it into a scarf later on.
 
 My "work space" was my kitchen counter and I used a baking sheet to lay out the clay pieces I had.  I bought multiple clay pieces but didn't even use entire blocks and I made six ornaments.  I have clay shaping tools, however, a butterknife works perfectly for those who don't have those in supply.

 For the carrot noses, I rolled it out and adjusted my position on where I was holding it against the counter.  By adjusting and rolling, it thinned out one end to create a point.  I then bent the carrots, as well as the branches, to give them an imperfect look and give each snowman character.

 While the pieces were baking at the temperature suggested on the clay packaging, I got started on filling each ornament with "snow."  While hovering over the kitchen sink, I filled each one with snow white glitter until there was a good base in each ornament.

 I then cut pieces of the ribbon in half.  With one of the edges being the wire piece, I folded it using an accordion style.  This made the ribbon look like it was a scarf left behind.


Drop the clay pieces into the ornament and rearrange using the edge of a pencil.  Some pieces can be partially covered by snow and have fun with it! :)


The most time consuming part of this craft is the creation of the pieces.  Baking only takes a few minutes and once the pieces have cooled, it's all about assembling them together.  The result is a really cute ornament that is perfect for an ornament exchange or Christmas gift!
 
 
If you liked this post, share it with others! If you feel particularly moved by it, leave a comment because I love feedback and discussion. Social media links are provided below and thanks for reading!
 photo signature_zpsc0b51015.jpg

Monday, December 2, 2013

Creating a Winter Wonderland: "Finding the Perfect Tree" Jar Tutorial

Skate with me...


Isn't that winter wonderland perfect? Create your own winter scene, perfect for your living room with this easy to assemble craft tutorial!


Place the plastic tree on top of your truck or car and secure with a glue gun.  Wrap baker's twine around the tree and vehicle, glue to secure.  Take the Christmas tree equipped vehicle and hot glue it to the base of your jar, making sure that the jar is on its side beforehand.  Add snow and top it off with the jar's cap.  Voila, there is a simple to make winter scene.
 
Have you picked out your tree yet?  Ryan and I don't have a truck or SUV at the moment, so it's our 2nd year rocking our acrylic tree.  It's small but still very cute!  What are some of your favorite Christmas traditions?
 
If you liked this post, share it with others! If you feel particularly moved by it, leave a comment because I love feedback and discussion. Social media links are provided below and thanks for reading!
 photo signature_zpsc0b51015.jpg

Sunday, October 20, 2013

Guest Feature: Halloween Card Tutorial with the Silhouette Cameo and Karla =]

-->
 So excited for this guest feature!  Karla is a wonderful fellow mil-spouse and Sconnie and she makes fantastic cards.  If you're looking to see a great Silhouette Cameo example or learn what the heck that is...read on!

    I was so honored when the lovely Kimberly Erskine asked me to be a guest feature on her blog. I was especially shocked because I myself am not a blogger nor would I label myself even a good writer. However, Kim is a fan of my cards and I love making cards so I didn’t hesitate to say yes. Kim and I met about three or so years back. We both attended the University of Wisconsin – Madison at the time and ironically enough, we were both about to marry men in the Marine Corps. Ever since my husband joined the Marines, I’ve been a huge fan of writing him letters and more recently making him cards. As you may or may not know, as a military couple, you spend A LOT of time apart. Since my husband enlisted in September of 2010 we have spent somewhere between 14-15 months together. You get really good at writing to each other.  I quickly got bored of typical letters and decided to get into card making not only as a hobby to help pass time but also so that I had more fun things to send my husband. Today I am going to show you a card I am making for my husband. He is coming home VERY SOON from a deployment, and I can’t wait to actually give him this card in person!

   I personally use the Silhouette Cameo for all of my paper cutting (and much more) needs. I love the versatility that it gives you. I began my card today by picking some designs from the online store. (If you don’t have a silhouette, you could easily cut most of these shapes out with scissors or other sorts of die cuts and stamps!)


I found this super cute card from Lori Whitlock. However, the balloon design did not fit my theme so I also pulled some pumpkins from her gallery as well.  


After changing the shape to match my theme, I made a cute banner with a variety of fonts and started thinking of colors and sizes for my card. The default size of the card layout I chose was A2, which I am not fond of. I like big ole 5X6.5” cards. 


Once I had all the sizes and layout established I picked out my papers. I used paper from the Lawn Fawn – Into the Woods paper pad set. I am absolutely obsessed with everything Lawn Fawn. If you don’t know anything about their products, stop reading this and go look them up now. They have adorable stamps, sequins, paper pads, and more. I love all of their stuff. 


I just love how this brown paper has a wood grain look to it. I just think it’s the funnest little detail. Anyways, now with my papers established I started cutting everything out with my Silhouette Cameo.


This thing is amazing. Look how detailed it can cut! 

Once all my pieces were cut out, I was ready to assemble the card into the layout I designed in the Silhouette Studio program.


I personally am a big fan of glue runners to adhere my shapes together. It doesn’t require drying and it’s super easy to use.

Once all my pieces were assembled together on the card front, I realized that it needed some extra pizazz. I’m not one for making “simple” cards. I also am incapable of spending less than an hour on a card I feel like. It’s just in my nature.


Anyways, so I started adhering various Lawn Fawn sequins onto the card with jewel glue (it’s what I have on hand). Overall I am very happy with how the card came together.


I will apologize for my poor iPhone photos and lack of instruction and commentary. As previously stated I am not a regular blogger, but I couldn’t resist sharing this opportunity with you all today! I hope you all like my little card!

-Karla W. 


Isn't Karla the best?  Absolutely love this adorable card and I may or may not be begging Ryan for a Silhouette for my birthday!!

If you liked this post, share it with others! If you feel particularly moved by it, leave a comment because I love feedback and discussion. Social media links are provided below and thanks for reading!
 photo signature_zpsc0b51015.jpg